Finishing touches
Before the final installation of the boiler onto the frame there are a few final details to address.
I wanted to add a constant intensity directional headlight in the front of the cab so I made a small regulator circuit using a National Semiconductor LP2951 IC. This circuit only requires 3 external parts and provides a constant 1.25v that is ideal for 1.5v light bulbs. In addition it’s nice and small and can fit just about anywhere.
I’ve had some inquiries about the circuit diagram of the lighting module so I put together a PDF schematic and a rough outline of little circuit board that I used. The board is simple enough that it can be cut out with a Xacto knife in about 15 minutes. For those interested a copy of the PDF can be accessed here.
Here are a couple of pictures of the lighting module:


I used a MV Lens for the front headlight and drilled a .052” hole in the back to accept the front of the light bulb. I fed the bulb through to the front of the cab and secured the bulb to the lens using ACC cement.
Here’s a picture of the inside of the cab with the lighting circuit in place:
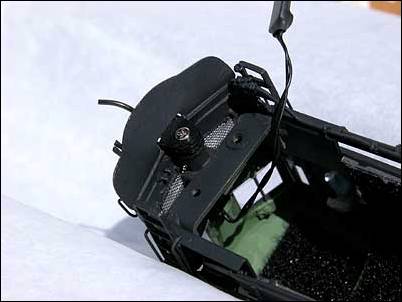
I should mention the front coupler mount it’s also shown in the photo above. In its original condition the Akane was not very conducive to front coupler mounting as it didn’t any place to secure the coupler. I removed the original coupler pocket and made a mounting post out of a piece of brass rod. I drilled and tapped the rod to accept a 2mm x 0.4 screw, and then soldered it indirectly to the top of the cab mounting bracket.
Okay there’s one last detail to address on the inside of the boiler. If you have ever had the boiler off a model have you noticed how the motor is always quieter with the boiler off? I don’t really think the motor is any louder, I just think it sounds louder because boiler enclosure acts just like a speaker enclosure and reflects all the sound out of the bottom of the cab. That’s my theory anyway.
I’ve found that this sound amplification can almost completely be eliminated by changing the characteristics of the inside surface of boiler around the motor. This next photo shows my solution to the problem, Velcro:

Velcro comes with two different pieces, the hook side, and the loop side. The loop side is nice and thick and when placed on the inside of the boiler it does a good job of cutting the sound amplification, or I guess I should say sound reflection from the bare brass walls. I don’t know how scientific this is, but it really works good. And best of all the Velcro comes in black and has sticky adhesive on one side so it’s simple to install.
Well I’ve come to the end of this restoration story, all that’s left is to show you is the pictures of the finished model. The next page is a gallery of photos of the first model. I’ll add photo’s of the second one as soon as it gets out of the paint shop.
Thanks for taking the time to read the saga, I hope you enjoyed it.
Page 13 - Last updated April 26, 2004
Finished photo gallery Previous page